Why Windows Phone needs WinRT

Pretty provoking title, uhm? 😉

But pretty fitting for me, as well! Some days ago I posted a tweet saying that I believe Windows Phone needs an adoption of WinRT:

In this article I want to go into more detail and explain why I think this is true.

Windows 8 and WinRT

First things first: Windows 8 is coming around the corner, believed to be published in late summer or autumn 2012 (btw: what do you think about „Windows Metro“ as name for the final? ;-)). The beta („Consumer preview“) will come soon at the end of February. Win8 employs a new programming model for a new kind of apps: „Metro-style apps“, that are touch-first. Metro-apps can run on either Intel or ARM hardware and thus span functionality from tablet over notebooks/ultrabooks to desktop PCs. The old Windows desktop remains as part of the „Intel version“ of Windows 8, but will likely not run on ARM.

The Metro-app programming model comes with a core component called WinRT (Windows Runtime). That’s kind of Win32 API for the new (Metro) world. It’s an integral part of the operating system core and not an on-top layer like Silverlight or .NET. Instead it’s native and exposes OS functionality to developers. While calling Win32 API from managed code involves things like P/Invoke, WinRT components can be called in natural way from every supported language. Metro-apps on top of WinRT can be built with XAML/C#, XAML/VB, XAML/C++ or HTML/JavaScript, games are supported through DirectX/C++. That’s a huge deal for developers, who get great flexibility to develop Metro apps. Furthermore, they can author their own WinRT components in C#/VB or C++ and use them from every supported WinRT language, even JavaScript. Thus for example they are able to implement a WinRT component in C# which holds the core business logic and use this component naturally from a JavaScript Metro app. Way cool!

Windows Phone till now

Ok, let’s come to Windows Phone. While it has great reviews (I use it as primary smartphone system, prefering it over my iPhone 4), Windows Phone is still falling behind in sense of marketshare. Approx. 2% (or less) in the US is not where Microsoft believed to be after 15 months. There is a lot of buzz and fanboy war on each side of the smartphone community why this situation is real and if it will change. For sure, with Nokia Microsoft now has a superb partner for developing phones which attract people by design and functionality, but are manufacturers the real problem?

For me, Windows Phone faces 2 main problems:

  • Hardware diversity: Consumers want to have a choice. They want to choose between budget phones over midrange devices up to the so-called „superphones“ on the market. Android has a great diversity in phone hardware and it sells really well. When you look at Windows Phone, you can’t see much diversity. Microsoft prescribes a relatively strict corset for hardware partners in terms of screen resolution, CPU, RAM, internal memory, interfaces, cameras, sensors and so on. Windows Phone devices don’t differ very much. And I would say the Nokia Lumia series are the first (Elop: „real“) Windows Phones that can attract people by design. For sure, diversity has its benefits and downsides. Developers don’t love it – no consistency means you must develop for the lowest common denominator or accept that your app doesn’t run everywhere without compromises. Android faces this problem and that’s one point why the Apple app ecosystem is way more attractive to users. It’s also why I think it’s a good choice from Microsoft to ensure consistency of the Windows Phone hardware, as well. But they have to loosen the rules! Budget phones need other hardware than superphones and in terms of market share Microsoft should take this into count. I know: practically specs don’t mean much for the overall experience. Look at Android: multi-core (handwarmer) CPUs and headspinning screen resolutions don’t make a good experience, in fact they can be rather harmful for the user experience. But customers aren’t really aware of this and that makes Android phones attractive. Microsoft could be the first to integrate the advantages of both the iPhone and Android phones – let’s hope they take the chance!
  • Apps: For me the app problem is of equal or higher value to the hardware diversity. While the Windows Phone Marketplace lists ~60.000 apps and is steadily growing, the main target platforms for app developers remain Android and iOS. Small companies are thinking twice if they should invest into a 2%-market-share-platform or just go with 90% on 2 other platforms. It’s kind of a doom loop: customers aren’t buying Windows Phones because relevant apps are missing… developers don’t make apps because customers are missing. While 60.000 apps sounds well and the marketplace is rapidly growing, many really important apps from Android/iOS are missing. Apps that people are asking for and which make people decide for one platform or the other. App statistics don’t say anything about the quality of the apps and in my experience Windows Phone is massively falling behind the other platforms, especially iOS.

WinRT on Windows Phone? Could this be? How could it help?

The first thing I thought when I saw the BUILD keynote and the introduction of WinRT was: ok, that’s cool… the next step should be to bring this to Windows Phone. In fact, there are rumors that Microsoft plans to swap the current Windows CE kernel from Windows Phone with the NT/MinWin kernel of Windows 8 in Windows Phone 8, codename „Apollo“, which is supposed to be released in autumn 2012.

What implications would come with such a step? First, it would be important in terms of inside development of Windows at Microsoft. One codebase means less costs and while Windows 8 is made for mobile devices like tablets as well, it would definitely make sense to have the same core OS functionality on Windows Phone.

Second, wouldn’t this consequently bring WinRT to Windows Phone? In my mind, in the mid-term this could ultimately happen. As written before and stated by Microsoft several times: WinRT is an integral part of the core operating system. Now if you get the core OS to another platform, what will happen to WinRT? In my mind, it would become part of the other platform (Windows Phone) as well! Now of course, WinRT isn’t part of MinWin (the kernel, read: the core of the core OS). But with MinWin in place, closing the gap to WinRT would be much easier. Perhaps it will not bring the full WinRT that you see for Windows 8, perhaps there are additional/adopted features and controls which are better suited for phones. But it would have the main APIs and main functionality (imho ~80% could be a level).

I believe that having the Windows kernel and WinRT on Windows Phone would give the platform an extreme boost. Let’s take a side look at Android and iOS for one moment: here you have one platform for consumers and developers that spans phones and tablets. A clear advantage of those platforms! WinRT could do the same for the Windows platform: phones and tablets… but in addition: notebooks, ultrabooks, desktop PCs – you get the point! It would be an extremely high opportunity for app developers. It would break down a wall for developers of Windows 8 Metro-apps to bring these apps on the same technology stack and the same languages to Windows Phone. Imagine: with WinRT on Windows Phone it would be possible to write HTML5/JS apps as well as XAML/C# apps and native XAML/C++ apps. Any doubts in the impacts to the Windows Phone ecosystem?

Silverlight on Windows Phone

Ok, I think that’s a pretty cool imagination. But wait: aren’t there 60.000 Silverlight/XNA apps on the Windows Phone Marketplace? What about those apps? Cut off and forget?

I believe there is another possibility. I think Microsoft could manage to build up a kind of „compatibility layer“ in parallel or on top of WinRT for Windows Phone to ensure backward compatibility, at least for a while. This layer could contain Silverlight and XNA as programming models in addition to WinRT and its supported languages. I think it will be hard if not impossible for Microsoft to develop such a thing without changing API behaviors and without cutting functionality. On the other side: what’s the option? I don’t think it’s a practicable way to cut all Windows Phone apps and scare off all current Windows Phone developers and consumers.


What do you think? Hot or not? Possible or insane? Call me a fool, I’m accustomed to this 😉

kick it on DotNetKicks.com

WP7 #4: A XAML/VM-driven Busy Indicator

This blog post introduces a Busy Indicator control for Windows Phone 7, which can be driven/defined by XAML and allows binding of the busy state via a ViewModel property. This control can be defined around arbitrary page elements and handles the visibility of the application bar, as well.

Introduction

Indicating the busy state is a common task of applications, that perform many actions asynchronously, while remaining responsive, like Silverlight and Windows Phone applications. It’s up to the developer to show the busy state in dependency of an operation and to disable parts of a page, which should not be selectable/changeable in the meantime. For Windows Phone 7 there are some solutions, but I was surprised that I couldn’t find a satisfying one for me. Either the level of control was inadequate (for example giving users the possibility to change/select controls) or the busy indicator was set/initialized directly from code (code behind/ViewModel), which is more kind of an anti-pattern for me. Thus I decided to look at my favorite busy indicator control for (web-target) Silverlight and to port it to Windows Phone 7.

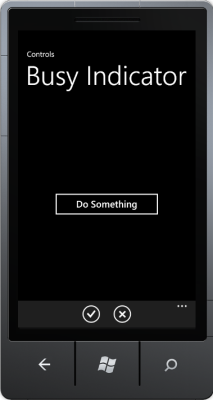
BusIndicator Not Busy State
Not Busy
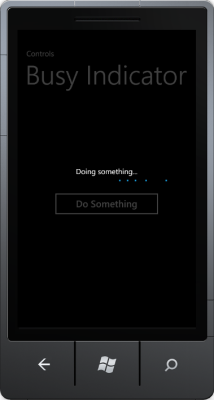
BusyIndicator with Full Busy State
Busy State on Whole Page
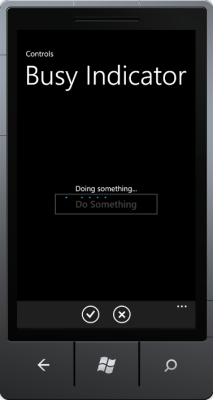
BusyIndicator with Partial Busy State
Partial Busy State

Structure and usage

My implementation of the busy indicator consists of 2 components: the BusyIndicatorControl as core part and the BusyIndicatorStyle in the Styles.xaml for the layout. The implementation uses the PerformanceProgressBar from the Silverlight for Windows Phone Toolkit (Feb2011 or newer), so make sure you’ve installed it.

The usage of the BusyIndicatorControl is fairly simple. In your XAML just place the control around those controls, which you want to set to „busy“. Bind the IsBusy property to your ViewModel/code behind property, set the BusyText and that’s it! Optionally, with HideApplicationBar you can indicate if you want to show or hide the application bar, when IsBusy==true.

Here’s an example, showing the usage of the control in a simple scenario:

<phone:PhoneApplicationPage
    x:Class="BusyIndicatorControl.MainPage"
    xmlns="http://schemas.microsoft.com/winfx/2006/xaml/presentation"
    xmlns:x="http://schemas.microsoft.com/winfx/2006/xaml"
    xmlns:phone="clr-namespace:Microsoft.Phone.Controls;assembly=Microsoft.Phone"
    xmlns:controls="clr-namespace:BusyIndicatorControl.Controls">

    <controls:BusyIndicatorControl x:Name="busyIndicator" Style="{StaticResource BusyIndicatorStyle}"
                                   BusyText="Doing something..."
			           IsBusy="{Binding IsDoingSomething}"
                                   HideApplicationBar="True">

        <Grid x:Name="LayoutRoot" Background="Transparent">
            <Grid.RowDefinitions>
                <RowDefinition Height="Auto"/>
                <RowDefinition Height="*"/>
            </Grid.RowDefinitions>

            <StackPanel x:Name="TitlePanel" Grid.Row="0" Margin="12,17,0,28">
                <TextBlock x:Name="ApplicationTitle" Text="Controls" 
                           Style="{StaticResource PhoneTextNormalStyle}"/>
                <TextBlock x:Name="PageTitle" Text="Busy Indicator" Margin="9,-7,0,0" 
                           Style="{StaticResource PhoneTextTitle1Style}"/>
            </StackPanel>

            <Grid x:Name="ContentPanel" Grid.Row="1" Margin="12,0,12,0"
                  Height="550" VerticalAlignment="Top">
                <Button Content="Do Something" Height="80" Width="300"
                    Click="Button_Click" />
            </Grid>
        </Grid>
    </controls:BusyIndicatorControl>

    <phone:PhoneApplicationPage.ApplicationBar>
        <shell:ApplicationBar IsVisible="True" IsMenuEnabled="True">
            <shell:ApplicationBarIconButton IconUri="/Assets/Icons/appbar.check.rest.png" Text="Check"
                                            Click="ApplicationBarIconButton_Click" />
            <shell:ApplicationBarIconButton IconUri="/Assets/Icons/appbar.close.rest.png" Text="Close"/>
        </shell:ApplicationBar>
    </phone:PhoneApplicationPage.ApplicationBar>

</phone:PhoneApplicationPage>

In this case, the whole phone page would be set to „disabled“ by the overlay of the busy indicator control and the application bar would hide, when the IsBusy property is set to true. IsBusy is bound to a property IsDoingSomething in the ViewModel, which controls the visibility and state of the busy indicator. Of course, you can choose the area to disable and change the property values and the style of the control as you want.

Features

This busy indicator includes the following main features:

  • Definition on arbitrary parts/controls of a phone page.
  • Definition through XAML.
  • Control through data binding, e.g. from ViewModel (busy state and text).
  • Creates an overlay over controls, that should be updated.
  • Option to hide the ApplicationBar, when the indicator is busy.

Sourcecode

Here’s a sample project, which includes the control and shows the usage of the busy indicator. Controls/BusyIndicatorControl.cs and Assets/Styles.xaml is what you need. Please make sure that you’ve installed the Silverlight for Windows Phone Toolkit with at least the version Feb2011. Feel free to change and redistribute the code at will…

[Sourcecode Download]

WP7 #3: Compiling Expressions

Just a short post today about how to compile Expressions under Windows Phone 7.

Expression Trees are a powerful feature since .NET 3.0. They can be used to create executable code fragments dynamically at runtime and have a wide range of purposes, for example to implement the Specification Pattern and Guard Classes. After you’ve built up your expression tree (which is a tree representation of real code), you can execute your code fragment by calling expression.Compile().Invoke().

When it comes to Windows Phone 7, that’s a problem… because there is no Compile() method on the Expression class. Since the WP7 platform has limitations at some points (regarding dynamic coding, Reflection, etc.), it doesn’t have a Compile() method at the moment (let’s hope the MS guys are fixing this in the near future…).

One solution I came across with can be found here. Those guys take the Expression compiler from the Mono project and use it instead. With a call of ExpressionCompiler.Compile(expression) you’re able to compile an expression. It works, sadly it’s kind of limited: the Expression compiler makes use of Reflection – since Silverlight doesn’t support Reflection on private members, all members used in the Expression must be public. This limits the range of this solution, so let’s hope that Microsoft will adopt the WP7 platform at this point…

The sources and binary DLL of the Expression compiler can be found here for free (MIT license): [Download]

WP7 #2: The Pivot and Panorama Controls

This second blog post on WP7 development will be rather short, showing the characteristics, similarities and differences as well as usage scenarios of both the Pivot and Panorama control.

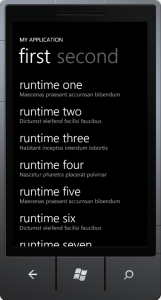
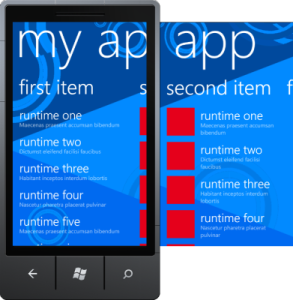
Windows Phone Pivot Application

Personally I like the look & feel of the Pivot and Panorama controls very much. Both give you a UI experience of „several pages“. You can change between those pages with a flick gesture or on the Pivot control by selecting the next page directly. It’s a cool UI and fits perfectly in many mobile usage scenarios.

The Pivot Control

The Pivot control gives you the UI experience of a „tabbed view„, optimized for mobile devices. The pages (= „PivotItems“) are like single tabs. Not all tabs are rendered at once, instead a tab is rendered when a neighbor tab is activated. Thus it’s rendered when you select the tab and the user gets a smooth UI experience. You can change between the tabs with a flick gesture or by clicking the title of the tab.

You can define a background image for the Pivot control as a static image that doesn’t change or move when you switch between tabs.

Usage scenarios of the Pivot Control consist in pages of independent data as well as several tabs as stages of hierarchical data or special filtered views of the same data set. The Pivot control is perfect to show categorized lists of data and to dig into the details of data. It doesn’t need this wide open space like the Panorama control.

The Panorama Control

Windows Phone Panorama ApplicationThe Panorama control gives a user the experience of a continuous view over several pages (= „PanoramaItems“). On the right border of a page you see the continuation to the next page and you can flick between pages back and forth. Unlike the Pivot control, all Panorama items are rendered initially when the Panorama control is loaded.

You can define a Panorama background image on the control that moves while you switch between the pages (as well as the application title). This gives a nice and appealing effect to users.

Usage scenarios of the Panorama control include overview pages like startscreens of your application. It’s like a showroom for your application, which is attracting users to your app. Panorama items are perfect entry points for applications, which summarize or aggregate application features and/or data and simplify navigation through the application. It’s not so good to create dense lists or to show details of data, what should be the domain of the Pivot control. Instead the Panorama control should have space to breath to give the best experience to users and should show just the important information at a central starting point. Furthermore you should not integrate an application bar into a Panorama view (use the Pivot instead).

Finally…

That’s it for today. I hope I could show you some commonalities and differences of  both the Pivot and the Panorama control. Both are great controls with a compelling user experience, but slightly different usage scenarios. The key rule should be: Panorama for the coarse, Pivot for the detail.

WP7 #1: Getting Started!

I’m currently engaged in the development of a more or less complex data-driven WP7 application, which utilizes many features of the WP7 development platform. In a series of upcoming blog posts I want to share my experiences and tips&tricks with you.

In this blog post I will show you how to get started with the WP7 development: tools you need, VS2010 project templates you get and how to set up images and icons for your application.

ToolsWindows Phone Logo

The great news for .NET developers are: The main development platform for WP7 is Silverlight! Not the current Silverlight 4, but a modified version of Silverlight 3, which is enhanced with support for the camera, the phone sensors and with phone controls like the Panorama and the Pivot control. My experiences so far are that there are some shortcomings, you cannot use every feature of Silverlight 3 and you have to learn the principles and characteristics of the WP7 platform (like Tombstoning, controls, Application Bar, UI design, …). But in the whole if you are a Silverlight developer then the learning curve is not very steep and it’s seamless like with no other platform to develop WP7 apps. It’s a great experience and you’re very fast in implementing your ideas in compelling apps.

Here are the tools that I’ve installed and which I’m using for WP7 development:

  • Visual Studio 2010: WP7 development is seamlessly integrated into the VS2010 IDE with all the development comfort (debugging, deploying, designer, Intellisense, …) you’re already comfortable with.
  • Windows Phone 7 Developer Tools (DL, +Jan11 Update, +Fix): Those tools give you a Windows Phone emulator and integration into VS2010.
  • Silverlight for Windows Phone Toolkit (DL): With the Toolkit you get dozens of new and modified components which you can use in your WP7 apps.
  • Expression Blend 4: Especially in WP7 apps you have to bother with a nice UI design and Blend is the tool of choice to do that. It’s a very feature-rich design tool and yes: you need some time to incorporate with it. But the features and the outcome are more than worth it!

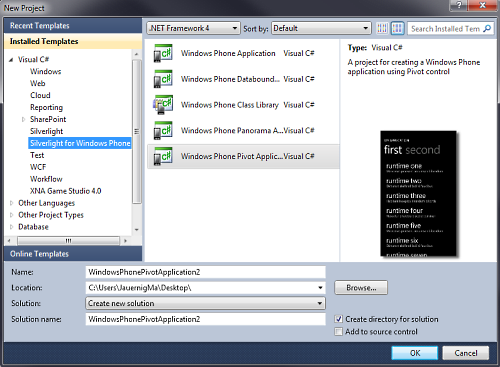
WP7 VS2010 Project TemplatesWP7 Project Templates

Starting a new WP7 project you have the choice between several „Silverlight for Windows Phone“ project templates in Visual Studio 2010 (if you have the WP7 tools installed):

  • Windows Phone Application: A blank WP7 application.
  • Windows Phone Databound Application: A WP7 application with some bound sample data (using the MVVM pattern).
  • Windows Phone Class Library: This gives you a class library by which you’re able to structure your WP7 solution. Remember that the WP7 development platform is not .NET and not „default“ Silverlight 3, thus this new type of class library is needed. You’re able to add „normal“ Silverlight projects to your WP7 solution as well, but this will only work if you don’t use Silverlight features that exceed the capabilities of the WP7 platform.
  • Windows Phone Panorama Application: Creates a project which uses the Panorama control to display bound sample data (using the MVVM pattern).
  • Windows Phone Pivot Application: Creates a project which uses the Pivot control to display bound sample data (using the MVVM pattern).

For Panorama and Pivot Applications there is another blog post coming, which covers the characteristics and use cases of both controls.

WP7 Project Properties

Let’s create a blank WP7 project, for example a „Windows Phone Pivot Application“. On the properties pane of your WP7 project you get several configuration options, i.e. you can define the name of your application that is shown in the app list or tile on your WP7 device and the icon for your application in the app list or tile. Those settings are stored in the „Properties/WMAppManifest.xml“ file, which you can edit manually as well and which is needed when deploying your WP7 app.

There are several icons/images that you can configure and which affect the identification and appearance of your app. The following list shows the images/icons you should know by default:

  • App List Icon:
    • Background: Shows an icon for you application in the app list of your WP7 device.
    • Requirements:
      • Image type has to be PNG.
      • Must reside in the root folder.
      • Build type must be „Content“.
    • Definition: Project Properties -> Application -> Deployment options -> Icon (or manually in the WMAppManifest.xml)
    • Default Name: ApplicationIcon.png
    • Size: 62 x 62 px
  • Live Tile Icon:
    • Background: Represents you app as a live tile on the homescreen.
    • Requirements:
      • Image type has to be PNG.
      • Must reside in the root folder.
      • Build type must be „Content“.
    • Definition: Project Properties -> Application -> Tile options -> Background image (or manually in the WMAppManifest.xml)
    • Default Name: Background.png (not very intuitive, is it?)
    • Size: 173 x 173 px
  • Splash Screen Image:
    • Background: Shows a splash screen while your app is loading.
    • Requirements:
      • Image type has to be JPG.
      • Must reside in the root folder.
      • Build type must be „Content“.
    • Definition: Name may not be changed, image is taken automatically when it exists.
    • Default Name: SplashScreenImage.jpg
    • Size: 480 x 800 px
  • Panorama Background Image:
    • Background: Defines the Background image of the Panorama control.
    • Definition: Use the Panorama.Background property.
    • Size (recommended): 1000 x 800 px  –  2000 x 800 px
  • Pivot Background Image:
    • Background: Defines the Background image of the Pivot control.
    • Definition: Use the Pivot.Background property.
    • Size: 480 x 800 px

As you can see above in the „Requirements„, you don’t have every degree of freedom how to create and where to place your images/icons. This was frustrating to me, because I like to place such things in a separate subfolder of my project. Instead, they have to reside in the root folder, which I don’t like very much.

That’s it for the moment. As said, just some introductory information to get started with WP7 development.

Got it: Samsung Omnia 7

Finally, after some months of creative freedom I’m coming back to blog something. Currently my topic of choice is Windows Phone 7 (WP7) and I want to write some posts about my experiences with the phone and especially with the platform in the following weeks and months. I’m interested in WP7 personally and by profession, since my company SDX is investing in this platform and the „several screens and the cloud“ vision of Microsoft (I’m explicitly not saying „3 screens“, because it doesn’t make sense to give it a certain number).

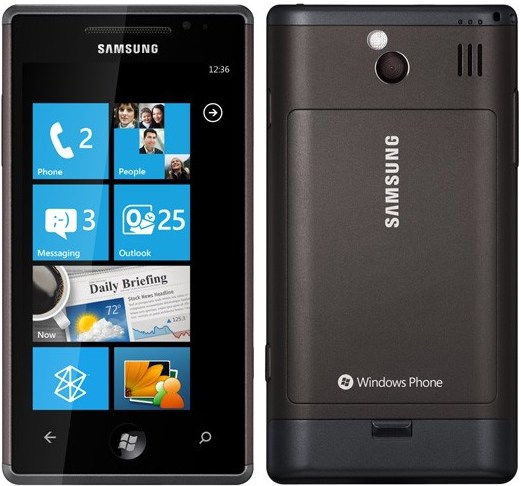
In this blog post I want to write about my experiences with the Samsung Omnia 7 just to get started with my WP7 blog series. I got the Omnia 7 some weeks ago and use it continuously. To get to the heart of my experiences: I love the Omnia 7!

First things first: me and the iPhone

Since 08/2010 I’m a proud iPhone 4 user and I’m really happy with it. It has an intuitive UI and user guidance, it’s fast and there are many really great apps and games for it. It’s an everyday companion and I use it for nearly everything digital: Twitter, Facebook, E-Mails, Tethering, gaming, organization, music, taking photos, information, navigation, … I use my iPhone extensively and didn’t think that any other phone could give me a similar experience…

Omnia 7: First impressionsSamsung Omnia 7

With the Omnia 7 it’s like with every new toy you get: in the first days you play around with everything. Thus after unpacking the device I begun with the initialization/configuration of my new Windows Phone 7. Adding my accounts was intuitive and very easy, integration with all my e-mail accounts, Windows Live and Facebook is seamless. Configuration is very simple at all. It gives you not much flexibility, but on the other side it feels very natural and you don’t have to pore over thick manuals to get everything to work.

UI, Tiles and Hubs

I started using the Omnia 7 extensively and I must admit: I love the UI! The overall „Metro UI“ design is clean, very clear and user-focussed. It has nothing to do with the awkward Windows Mobile UI, it’s just fresh and beautiful. The level of animations is just right to guide the user and to give him a nice experience. The concept of live tiles and hubs on the homescreen is very convincing, it’s user-centric instead of app-centric. It’s how a consumer phone UI should look and it’s really compelling to me.

There are just some downsides on the UI. I would love an E-Mail hub and I don’t like the „app list“ very much. Of course you can pin important apps as tiles to the homescreen, but I’m not a fan of a long tile tube. One solution could be the definition of custom „hubs“, where you can integrate a bunch of apps and to which you have instant access by this way. For me this would be a real improvement!

Omnia 7 and other WP7 devices

I compared the Samsung Omnia 7 with other WP7 devices of my colleagues: HTC 7 Mozart and HTC HD7. And in my opinion the Omnia 7 beats both devices clearly. It has a better speed when starting and using applications, giving a smoother UI experience at all. The AMOLED display is fantastic! Great colors, clear fonts, fantastic brightness and contrast. Clearly superior over the HTC devices. The form factor is good for me, it feels very comfortable in my hand. Battery life is really good, thus in my opinion it’s a a great piece of hardware!

Omnia 7 vs. iPhone

When it comes to the iPhone I think the Omnia 7 is nearly meeting on eye level, with the iPhone as matured winner. The iPhone 4 is superior in its exclusivity, its manufacturing and I love the Retina display! It has the great AppStore with fantastic apps. The Omnia 7 respectively Windows Phone 7 can’t compete with that! Of course, the WP7 marketplace is growing rapidly, but it’s still missing a mass of really great apps and games. In comparison to Apple’s AppStore apps or games are more expensive, partially terrifying! For example, the game „Assassin’s Creed“ is priced 0.99$ in the AppStore, while you have to pay 6.99$ on the WP7 Marketplace – wtf? This is really a wrong signal for me, but I believe that prices will drop when Marketplace competition increases.

When it comes to the UI, both systems are doing very well. While the iPhone has a feature-rich UI, Windows Phone 7 shines with its user-centric interface and with its simplicity and usability. I personally prefer the WP7 UI!

Concerning Multimedia my experiences are that the iPhone makes better photos, while the Omnia 7 with Windows Phone 7 has a better interface for taking and viewing photos. Furthermore I compared the sound of both devices and in my subjective opinion the Omnia 7 wins. With the same in-ear headphones the Omnia 7 produces clearer sounds with finer levels and a convincing bass. Meanwhile I prefer hearing music from my Omnia 7 instead of my iPhone. Moreover the integrated phone speakers of the Omnia 7 are much better than the silent iPhone speakers.

Overall experience

To sum up, I didn’t think that as proud iPhone 4 owner I could get a new, fresh and compelling mobile experience. But Windows Phone 7 convinced me of the contrary. It comes with an easy-to-use, intuitive and user-centric interface, which isn’t just another iPhone clone, but which has some interesting characteristics. The hardware of the Omnia 7 is great and in my opinion it’s one of the best (if not the best) WP7 devices out there at the moment.

Of course there are downsides: the marketplace is still small and many apps are too expensive or of poor quality. Windows Phone 7 itself is not very feature-rich and has well-known missing features (Tethering etc.). But I used the Omnia 7 for some weeks now and in my opinion it’s a great consumer phone! WP7 is a completely rounded system and I enjoy using it! Microsoft still has a long way to go, but they delivered a great „version 1“. If they’re able to use the initial momentum and deliver the missing features in the short-term, I believe that Windows Phone will be a serious and successful competitor to Apple’s iPhone and Google’s Android in the middle- and long-term. The stage is set for a new star on the smartphone sky, let’s see if it can shine bright…

A new one

Hey guys,

Uoh, I’ve not written anything for a while now. What happened? I was busy with business activities as well as with private stuff. Thus I wrote an article about data access possibilities with Windows Phone 7 for the German dotnet.pro magazine and I’ve shifted some blogging activities to my company’s blog http://flurfunk.sdx-ag.de (German). Moreover I attended the Professional Scrum Developer workshop and got many experiences from that. I’m very happy with my company SDX and I’m glad to have colleagues who inspire me and I love deeper conversations with them. Thank you for a great year 2010, guys! Furthermore, I’m currently using more time for my private life. My wife has finished her exam as teacher for the secondary school and found a job nearby Frankfurt. Currently we’re searching an apartment (didn’t think this would be so tough before…) and will hopefully move in spring 2011. For myself, I’m constantly changing my view to life and finding my way of life and got some inspiration on this during the last months.

So, I just want to wish you a happy and successful year 2011!

I’ve got the feeling that 2011 will be a great year. For my blogging activities I hope to come back again with my central focus points for 2011: Silverlight/WP7, frameworks, patterns and architecture. Let’s get the best out of this year, the show goes on!

Regards, Matthias

C#: Efficient retrieval of Expression values

Some days ago I’ve had an interesting technical discussion with a colleague of mine regarding the possibility of implementing Guard classes with Expressions in C#. Such a class enables easy argument checking in form of (technical) preconditions on method entry. Thereby the checking logic is encapsulated in the Guard class.

One method of such a Guard class could be AssertNotNull() which checks, if a given method argument equals null and if true throws an ArgumentNullException. By the use of Expressions the parameter to check can be given to AssertNotNull() in a very elegant way:

public void MyMethod(SomeType elem)
{
    Guard.AssertNotNull(() => elem);

    // actual method logic
}

Through evaluation of the Expression the AssertNotNull() method is able to extract both the name and value of the argument. Thus there’s no necessity to provide both as parameters to AssertNotNull(). Moreover you do not need to provide the argument name as string.

Value by compilation

It’s very easy to extract the argument value through compilation and invocation of the Expression. Hence this solution is often taken by developers who work with Expressions in this way. The following snippet shows this implementation:

public static class Guard
{
    public static void AssertNotNull<T>(Expression<Func<T>> selector)
    {
        T value = selector.Compile().Invoke();
        if (value == null)
        {
            string name = ((MemberExpression)selector.Body).Member.Name;
            throw new ArgumentNullException(name);
        }
    }
}

Value by evaluation

In the conversation with my colleague we caught the point that the extraction of the argument value from an Expression is even possible without performing the costly compilation. This is enabled by converting the Expression into a ConstantExpression, from which we can catch the value by executing GetValue() on a FieldInfo instance:

public static class Guard
{
    public static void AssertNotNull<T>(Expression<Func<T>> selector)
    {
        var memberSelector = (MemberExpression)selector.Body;
        var constantSelector = (ConstantExpression)memberSelector.Expression;
        object value = ((FieldInfo)memberSelector.Member)
            .GetValue(constantSelector.Value);

        if (value == null)
        {
            string name = ((MemberExpression)selector.Body).Member.Name;
            throw new ArgumentNullException(name);
        }
    }
}

This doesn’t look very spectacular on first sight. The code is more complicated and it’s necessary to provide a variable in the Expression. Properties and data hierarchies don’t work with this solution, but this shouldn’t be a problem when checking argument values against null. Of course with a more sophisticated solution (iterative/recursive evaluation of the Expression tree) you can enable such scenarios, but this is out of scope of this blog post…

Looking at the execution times

So what’s the point of the second solution? It’s simple: compilation is much more time-intensive! In a little runtime test I’ve compared both solutions. A call of AssertNotNull() with a valid argument (!= null) over 10.000 iterations resulted in the following execution times:

Please note the immensive time difference! The compiled solution takes more than 53 seconds, while the evaluation takes less than 0,35 seconds. This makes a time factor of more than 156, by which the evaluated solution is faster than the compiled approach.

Conclusion

When handling with Expressions you should take the execution time into account! Once a method is executed inside of a loop and you follow defensive programming and check method parameters at every place, an argument check can become an important time factor. When possible you should favor evaluation over compilation of Expressions.

kick it on DotNetKicks.com

Explicit Property Memento

Introduction

Some weeks ago I’ve introduced the Property Memento pattern as solution for temporarily saving the state of an entity’s property on creation of the Property Memento and restoring this initial state when the Property Memento disposes. I’ve shown that the using(){} syntax separates between the Property Memento initialization and the core logic which should be run inside the Memento with temporarily changed property values.

While I like the pattern and its usage, I see that the using syntax can be disturbing for developers who don’t know the internal implementation of the Property Memento. The implementation mixes using as common syntax with other semantics, which violates the uniformity principle of computer science.

A colleague suggested an implementation of the pattern, which makes the three steps in a Property Memento’s lifetime explicit:

  1. Memorize the current properties values.
  2. Invoke some actions.
  3. Restore the memorized values.

I’ve adopted his implementation to fit my needs of memorizing properties even for more than one entity.

Explicit Property Memento implementation

The implementation of the Explicit Property Memento projects the 3 steps of a Property Memento by the methods Memorize(), Invoke() and RestoreValues(). Thus the intention is revealed, which yields to a better understanding of the whole process. Instead of memorizing one property of just a single entity on the creation of the Property Memento, the ExplicitPropertyMemento has the ability to store several property values of more than one entity. This makes the implementation a bit heavier, but the usage very smart. First here’s the implementation part:

public class ExplicitPropertyMemento
{
    class MemorizedProperty
    {
        public string Name { get; set; }
        public object Value { get; set; }
    }

    private readonly IDictionary<object, List<MemorizedProperty>> _memorizedProperties
        = new Dictionary<object, List<MemorizedProperty>>();

    public static ExplicitPropertyMemento Create
    {
        get { return new ExplicitPropertyMemento(); }
    }

    public ExplicitPropertyMemento Memorize(
        object classInstance, params Expression<Func<object>>[] propertySelectors)
    {
        if(propertySelectors == null)
            return this;

        var properties = new List<MemorizedProperty>();
        foreach(var propertySelector in propertySelectors)
        {
            string propertyName = GetPropertyName(propertySelector);
            properties.Add(new MemorizedProperty
                {
                    Name = propertyName,
                    Value = GetPropertyValue(classInstance, propertyName)
                });
        }

        if(_memorizedProperties.ContainsKey(classInstance))
            _memorizedProperties[classInstance].AddRange(properties);
        else
            _memorizedProperties.Add(classInstance, properties);

        return this;
    }

    public ExplicitPropertyMemento Memorize<TProperty>(object classInstance,
        Expression<Func<object>> propertySelector, TProperty tempValue)
    {
        Memorize(classInstance, propertySelector);

        string propertyName = GetPropertyName(propertySelector);
        SetPropertyValue(classInstance, propertyName, tempValue);

        return this;
    }

    public ExplicitPropertyMemento Invoke(Action action)
    {
        try
        {
            action.Invoke();
        }
        catch
        {
            RestoreValues();
            throw;
        }

        return this;
    }

    public void RestoreValues()
    {
        foreach(var memorizedEntity in _memorizedProperties)
        {
            object classInstance = memorizedEntity.Key;
            foreach(var property in memorizedEntity.Value)
                SetPropertyValue(classInstance, property.Name, property.Value);
        }
    }

    private string GetPropertyName(Expression<Func<object>> propertySelector)
    {
        var body = propertySelector.Body;
        if (body.NodeType == ExpressionType.Convert)
            body = ((UnaryExpression)body).Operand;
        return ((MemberExpression)body).Member.Name;
    }

    private object GetPropertyValue(object classInstance, string propertyName)
    {
        return classInstance
            .GetType()
            .GetProperty(propertyName)
            .GetValue(classInstance, null);
    }

    private void SetPropertyValue(object classInstance, string propertyName, object value)
    {
        classInstance
            .GetType()
            .GetProperty(propertyName)
            .SetValue(classInstance, value, null);
    }
}

Usage example

The usage is explicitly projecting the Property Memento process by the methods Memorize(), Invoke() and RestoreValues() and it’s straightforward. In case of the introductory example it’s shown next:

private void SomeMethod(...)
{
    int oldValSumHeight = _valSum.Height;
    int newValSumHeight = 0;

    var newAnchor = AnchorStyles.Top | AnchorStyles.Left;
    ExplicitPropertyMemento.Create
        .Memorize(_valSum, () => _valSum.AutoSize, true)
        .Memorize(_valSum, () => _valSum.Anchor, newAnchor)
        .Memorize(_detailContent, () => _detailContent.Anchor, newAnchor)
        .Invoke(() =>
            {
                _valSum.SetValidationMessages(validationMessages);

                newValSumHeight = _valSum.Height;
                Height = Height - oldValSumHeight + newValSumHeight;
            })
        .RestoreValues();

    _valSum.Height = newValSumHeight;
}

Alternatively the ExplicitPropertyMemento implementation allows specifying more than one property as argument for the Memorize() method, if you don’t want to set the new property value directly by this method. Thus you could use some code like this:

private void SomeMethod(...)
{
    int oldValSumHeight = _valSum.Height;
    int newValSumHeight = 0;

    ExplicitPropertyMemento.Create
        .Memorize(_valSum, () => _valSum.AutoSize, () => _valSum.Anchor)
        .Memorize(_detailContent, () => _detailContent.Anchor)
        .Invoke(() =>
            {
                _valSum.AutoSize = true;
                _valSum.Anchor = AnchorStyles.Top | AnchorStyles.Left;
                _detailContent.Anchor = AnchorStyles.Top | AnchorStyles.Left;

                _valSum.SetValidationMessages(validationMessages);

                newValSumHeight = _valSum.Height;
                Height = Height - oldValSumHeight + newValSumHeight;
            })
        .RestoreValues();

    _valSum.Height = newValSumHeight;
}

Conclusion

Instead of the using syntax this article has shown an Explicit Property Memento implementation, which makes the whole Property Memento process explicit by defining methods for each step of the process. I still like the using syntax because it’s very dense, but in terms of intention revealing I also like the ExplicitPropertyMemento. What’s your opinion? At least feel free to choose the implementation you prefer 🙂

kick it on DotNetKicks.com

Follow-up: Property Memento pattern

In a previous blog post I introduced the Property Memento pattern as way to temporarily save the value of an entity’s properties and restoring the initial values when the memento disposes.

While I like the pattern itself I think the syntax can be done better. Here comes an implementation that uses just one type parameter for the property type and misses the reflection helper. The static class PropertyMemento helps to generate PropertyMemento<T> instances without specifying the type parameter (it’s inferred by the compiler):

public class PropertyMemento<TProperty> : IDisposable
{
    private readonly TProperty _originalPropertyValue;
    private readonly object _classInstance;
    private readonly string _propertyName;

    public PropertyMemento(object classInstance,
        Expression<Func<TProperty>> propertySelector)
    {
        _classInstance = classInstance;
        _propertyName = ((MemberExpression)propertySelector.Body).Member.Name;
        _originalPropertyValue = GetPropertyValue();
    }

    public PropertyMemento(object classInstance,
        Expression<Func<TProperty>> propertySelector, TProperty tempValue)
        : this(classInstance, propertySelector)
    {
        SetPropertyValue(tempValue);
    }

    public void Dispose()
    {
        SetPropertyValue(_originalPropertyValue);
    }

    private TProperty GetPropertyValue()
    {
        return (TProperty)_classInstance
            .GetType()
            .GetProperty(_propertyName)
            .GetValue(_classInstance, null);
    }

    private void SetPropertyValue(TProperty value)
    {
        _classInstance
            .GetType()
            .GetProperty(_propertyName)
            .SetValue(_classInstance, value, null);
    }
}

public static class Memento
{
    public static PropertyMemento<TProperty> From<TProperty>(object classInstance,
        Expression<Func<TProperty>> propertySelector)
    {
        return new PropertyMemento<TProperty>(classInstance, propertySelector);
    }

    public static PropertyMemento<TProperty> From<TProperty>(object classInstance,
        Expression<Func<TProperty>> propertySelector, TProperty tempValue)
    {
        return new PropertyMemento<TProperty>(classInstance, propertySelector, tempValue);
    }
}

And now its usage in the same scenario shown in the original blog post:

private void SomeMethod(...)
{
    int oldValSumHeight = _valSum.Height;
    int newValSumHeight = 0;

    AnchorStyles newAnchor = AnchorStyles.Top | AnchorStyles.Left;
    using (PropertyMemento.From(_valSum, () => _valSum.AutoSize, true))
    using (PropertyMemento.From(_valSum, () => _valSum.Anchor, newAnchor))
    using (PropertyMemento.From(_detailContent, () => _detailContent.Anchor, newAnchor))
    {
        _valSum.SetValidationMessages(validationMessages);

        newValSumHeight = _valSum.Height;
        Height = Height - oldValSumHeight + newValSumHeight;
    }

    _valSum.Height = newValSumHeight;
}

As said before: just a little improvement to the original code which slightly improves the implementation and usage of the pattern…