WP7 #4: A XAML/VM-driven Busy Indicator

This blog post introduces a Busy Indicator control for Windows Phone 7, which can be driven/defined by XAML and allows binding of the busy state via a ViewModel property. This control can be defined around arbitrary page elements and handles the visibility of the application bar, as well.

Introduction

Indicating the busy state is a common task of applications, that perform many actions asynchronously, while remaining responsive, like Silverlight and Windows Phone applications. It’s up to the developer to show the busy state in dependency of an operation and to disable parts of a page, which should not be selectable/changeable in the meantime. For Windows Phone 7 there are some solutions, but I was surprised that I couldn’t find a satisfying one for me. Either the level of control was inadequate (for example giving users the possibility to change/select controls) or the busy indicator was set/initialized directly from code (code behind/ViewModel), which is more kind of an anti-pattern for me. Thus I decided to look at my favorite busy indicator control for (web-target) Silverlight and to port it to Windows Phone 7.
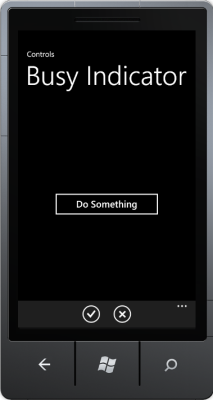
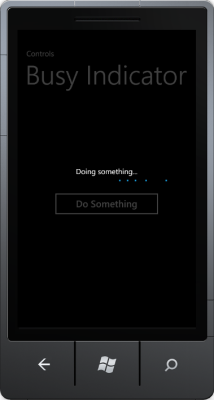
BusIndicator Not Busy State
Not Busy
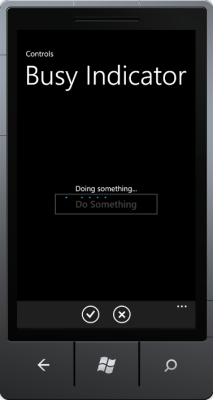
BusyIndicator with Full Busy State
Busy State on Whole Page
BusyIndicator with Partial Busy State
Partial Busy State

Structure and usage

My implementation of the busy indicator consists of 2 components: the BusyIndicatorControl as core part and the BusyIndicatorStyle in the Styles.xaml for the layout. The implementation uses the PerformanceProgressBar from the Silverlight for Windows Phone Toolkit (Feb2011 or newer), so make sure you’ve installed it.

The usage of the BusyIndicatorControl is fairly simple. In your XAML just place the control around those controls, which you want to set to „busy“. Bind the IsBusy property to your ViewModel/code behind property, set the BusyText and that’s it! Optionally, with HideApplicationBar you can indicate if you want to show or hide the application bar, when IsBusy==true.

Here’s an example, showing the usage of the control in a simple scenario:

<phone:PhoneApplicationPage
    x:Class="BusyIndicatorControl.MainPage"
    xmlns="http://schemas.microsoft.com/winfx/2006/xaml/presentation"
    xmlns:x="http://schemas.microsoft.com/winfx/2006/xaml"
    xmlns:phone="clr-namespace:Microsoft.Phone.Controls;assembly=Microsoft.Phone"
    xmlns:controls="clr-namespace:BusyIndicatorControl.Controls">

    <controls:BusyIndicatorControl x:Name="busyIndicator" Style="{StaticResource BusyIndicatorStyle}"
                                   BusyText="Doing something..."
			           IsBusy="{Binding IsDoingSomething}"
                                   HideApplicationBar="True">

        <Grid x:Name="LayoutRoot" Background="Transparent">
            <Grid.RowDefinitions>
                <RowDefinition Height="Auto"/>
                <RowDefinition Height="*"/>
            </Grid.RowDefinitions>

            <StackPanel x:Name="TitlePanel" Grid.Row="0" Margin="12,17,0,28">
                <TextBlock x:Name="ApplicationTitle" Text="Controls" 
                           Style="{StaticResource PhoneTextNormalStyle}"/>
                <TextBlock x:Name="PageTitle" Text="Busy Indicator" Margin="9,-7,0,0" 
                           Style="{StaticResource PhoneTextTitle1Style}"/>
            </StackPanel>

            <Grid x:Name="ContentPanel" Grid.Row="1" Margin="12,0,12,0"
                  Height="550" VerticalAlignment="Top">
                <Button Content="Do Something" Height="80" Width="300"
                    Click="Button_Click" />
            </Grid>
        </Grid>
    </controls:BusyIndicatorControl>

    <phone:PhoneApplicationPage.ApplicationBar>
        <shell:ApplicationBar IsVisible="True" IsMenuEnabled="True">
            <shell:ApplicationBarIconButton IconUri="/Assets/Icons/appbar.check.rest.png" Text="Check"
                                            Click="ApplicationBarIconButton_Click" />
            <shell:ApplicationBarIconButton IconUri="/Assets/Icons/appbar.close.rest.png" Text="Close"/>
        </shell:ApplicationBar>
    </phone:PhoneApplicationPage.ApplicationBar>

</phone:PhoneApplicationPage>

In this case, the whole phone page would be set to „disabled“ by the overlay of the busy indicator control and the application bar would hide, when the IsBusy property is set to true. IsBusy is bound to a property IsDoingSomething in the ViewModel, which controls the visibility and state of the busy indicator. Of course, you can choose the area to disable and change the property values and the style of the control as you want.

Features

This busy indicator includes the following main features:

  • Definition on arbitrary parts/controls of a phone page.
  • Definition through XAML.
  • Control through data binding, e.g. from ViewModel (busy state and text).
  • Creates an overlay over controls, that should be updated.
  • Option to hide the ApplicationBar, when the indicator is busy.

Sourcecode

Here’s a sample project, which includes the control and shows the usage of the busy indicator. Controls/BusyIndicatorControl.cs and Assets/Styles.xaml is what you need. Please make sure that you’ve installed the Silverlight for Windows Phone Toolkit with at least the version Feb2011. Feel free to change and redistribute the code at will…
[Sourcecode Download]

WP7 #3: Compiling Expressions

Just a short post today about how to compile Expressions under Windows Phone 7.

Expression Trees are a powerful feature since .NET 3.0. They can be used to create executable code fragments dynamically at runtime and have a wide range of purposes, for example to implement the Specification Pattern and Guard Classes. After you’ve built up your expression tree (which is a tree representation of real code), you can execute your code fragment by calling expression.Compile().Invoke().

When it comes to Windows Phone 7, that’s a problem… because there is no Compile() method on the Expression class. Since the WP7 platform has limitations at some points (regarding dynamic coding, Reflection, etc.), it doesn’t have a Compile() method at the moment (let’s hope the MS guys are fixing this in the near future…).

One solution I came across with can be found here. Those guys take the Expression compiler from the Mono project and use it instead. With a call of ExpressionCompiler.Compile(expression) you’re able to compile an expression. It works, sadly it’s kind of limited: the Expression compiler makes use of Reflection – since Silverlight doesn’t support Reflection on private members, all members used in the Expression must be public. This limits the range of this solution, so let’s hope that Microsoft will adopt the WP7 platform at this point…

The sources and binary DLL of the Expression compiler can be found here for free (MIT license): [Download]

WP7 #2: The Pivot and Panorama Controls

This second blog post on WP7 development will be rather short, showing the characteristics, similarities and differences as well as usage scenarios of both the Pivot and Panorama control.

Windows Phone Pivot Application

Personally I like the look & feel of the Pivot and Panorama controls very much. Both give you a UI experience of „several pages“. You can change between those pages with a flick gesture or on the Pivot control by selecting the next page directly. It’s a cool UI and fits perfectly in many mobile usage scenarios.

The Pivot Control

The Pivot control gives you the UI experience of a „tabbed view„, optimized for mobile devices. The pages (= „PivotItems“) are like single tabs. Not all tabs are rendered at once, instead a tab is rendered when a neighbor tab is activated. Thus it’s rendered when you select the tab and the user gets a smooth UI experience. You can change between the tabs with a flick gesture or by clicking the title of the tab.

You can define a background image for the Pivot control as a static image that doesn’t change or move when you switch between tabs.

Usage scenarios of the Pivot Control consist in pages of independent data as well as several tabs as stages of hierarchical data or special filtered views of the same data set. The Pivot control is perfect to show categorized lists of data and to dig into the details of data. It doesn’t need this wide open space like the Panorama control.

The Panorama Control

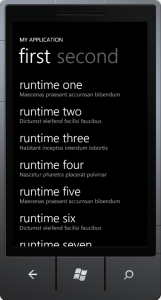
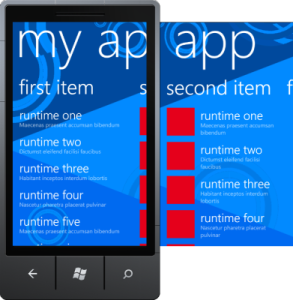
Windows Phone Panorama ApplicationThe Panorama control gives a user the experience of a continuous view over several pages (= „PanoramaItems“). On the right border of a page you see the continuation to the next page and you can flick between pages back and forth. Unlike the Pivot control, all Panorama items are rendered initially when the Panorama control is loaded.

You can define a Panorama background image on the control that moves while you switch between the pages (as well as the application title). This gives a nice and appealing effect to users.

Usage scenarios of the Panorama control include overview pages like startscreens of your application. It’s like a showroom for your application, which is attracting users to your app. Panorama items are perfect entry points for applications, which summarize or aggregate application features and/or data and simplify navigation through the application. It’s not so good to create dense lists or to show details of data, what should be the domain of the Pivot control. Instead the Panorama control should have space to breath to give the best experience to users and should show just the important information at a central starting point. Furthermore you should not integrate an application bar into a Panorama view (use the Pivot instead).

Finally…

That’s it for today. I hope I could show you some commonalities and differences of  both the Pivot and the Panorama control. Both are great controls with a compelling user experience, but slightly different usage scenarios. The key rule should be: Panorama for the coarse, Pivot for the detail.

WP7 #1: Getting Started!

I’m currently engaged in the development of a more or less complex data-driven WP7 application, which utilizes many features of the WP7 development platform. In a series of upcoming blog posts I want to share my experiences and tips&tricks with you.

In this blog post I will show you how to get started with the WP7 development: tools you need, VS2010 project templates you get and how to set up images and icons for your application.

ToolsWindows Phone Logo

The great news for .NET developers are: The main development platform for WP7 is Silverlight! Not the current Silverlight 4, but a modified version of Silverlight 3, which is enhanced with support for the camera, the phone sensors and with phone controls like the Panorama and the Pivot control. My experiences so far are that there are some shortcomings, you cannot use every feature of Silverlight 3 and you have to learn the principles and characteristics of the WP7 platform (like Tombstoning, controls, Application Bar, UI design, …). But in the whole if you are a Silverlight developer then the learning curve is not very steep and it’s seamless like with no other platform to develop WP7 apps. It’s a great experience and you’re very fast in implementing your ideas in compelling apps.

Here are the tools that I’ve installed and which I’m using for WP7 development:

  • Visual Studio 2010: WP7 development is seamlessly integrated into the VS2010 IDE with all the development comfort (debugging, deploying, designer, Intellisense, …) you’re already comfortable with.
  • Windows Phone 7 Developer Tools (DL, +Jan11 Update, +Fix): Those tools give you a Windows Phone emulator and integration into VS2010.
  • Silverlight for Windows Phone Toolkit (DL): With the Toolkit you get dozens of new and modified components which you can use in your WP7 apps.
  • Expression Blend 4: Especially in WP7 apps you have to bother with a nice UI design and Blend is the tool of choice to do that. It’s a very feature-rich design tool and yes: you need some time to incorporate with it. But the features and the outcome are more than worth it!

WP7 VS2010 Project TemplatesWP7 Project Templates

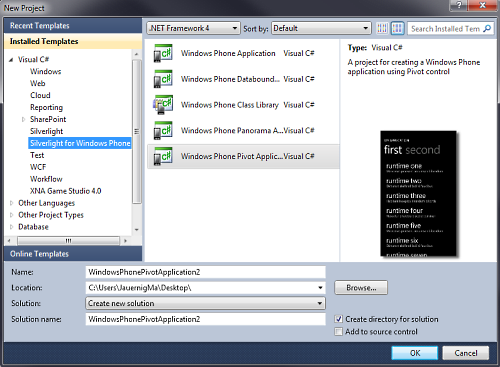
Starting a new WP7 project you have the choice between several „Silverlight for Windows Phone“ project templates in Visual Studio 2010 (if you have the WP7 tools installed):

  • Windows Phone Application: A blank WP7 application.
  • Windows Phone Databound Application: A WP7 application with some bound sample data (using the MVVM pattern).
  • Windows Phone Class Library: This gives you a class library by which you’re able to structure your WP7 solution. Remember that the WP7 development platform is not .NET and not „default“ Silverlight 3, thus this new type of class library is needed. You’re able to add „normal“ Silverlight projects to your WP7 solution as well, but this will only work if you don’t use Silverlight features that exceed the capabilities of the WP7 platform.
  • Windows Phone Panorama Application: Creates a project which uses the Panorama control to display bound sample data (using the MVVM pattern).
  • Windows Phone Pivot Application: Creates a project which uses the Pivot control to display bound sample data (using the MVVM pattern).

For Panorama and Pivot Applications there is another blog post coming, which covers the characteristics and use cases of both controls.

WP7 Project Properties

Let’s create a blank WP7 project, for example a „Windows Phone Pivot Application“. On the properties pane of your WP7 project you get several configuration options, i.e. you can define the name of your application that is shown in the app list or tile on your WP7 device and the icon for your application in the app list or tile. Those settings are stored in the „Properties/WMAppManifest.xml“ file, which you can edit manually as well and which is needed when deploying your WP7 app.

There are several icons/images that you can configure and which affect the identification and appearance of your app. The following list shows the images/icons you should know by default:

  • App List Icon:
    • Background: Shows an icon for you application in the app list of your WP7 device.
    • Requirements:
      • Image type has to be PNG.
      • Must reside in the root folder.
      • Build type must be „Content“.
    • Definition: Project Properties -> Application -> Deployment options -> Icon (or manually in the WMAppManifest.xml)
    • Default Name: ApplicationIcon.png
    • Size: 62 x 62 px
  • Live Tile Icon:
    • Background: Represents you app as a live tile on the homescreen.
    • Requirements:
      • Image type has to be PNG.
      • Must reside in the root folder.
      • Build type must be „Content“.
    • Definition: Project Properties -> Application -> Tile options -> Background image (or manually in the WMAppManifest.xml)
    • Default Name: Background.png (not very intuitive, is it?)
    • Size: 173 x 173 px
  • Splash Screen Image:
    • Background: Shows a splash screen while your app is loading.
    • Requirements:
      • Image type has to be JPG.
      • Must reside in the root folder.
      • Build type must be „Content“.
    • Definition: Name may not be changed, image is taken automatically when it exists.
    • Default Name: SplashScreenImage.jpg
    • Size: 480 x 800 px
  • Panorama Background Image:
    • Background: Defines the Background image of the Panorama control.
    • Definition: Use the Panorama.Background property.
    • Size (recommended): 1000 x 800 px  –  2000 x 800 px
  • Pivot Background Image:
    • Background: Defines the Background image of the Pivot control.
    • Definition: Use the Pivot.Background property.
    • Size: 480 x 800 px

As you can see above in the „Requirements„, you don’t have every degree of freedom how to create and where to place your images/icons. This was frustrating to me, because I like to place such things in a separate subfolder of my project. Instead, they have to reside in the root folder, which I don’t like very much.

That’s it for the moment. As said, just some introductory information to get started with WP7 development.